Time-lapse photography: creative uses and the interval math that keeps you out of trouble
By Jeff Beem
Time-lapse is one of those techniques that feels like a small trick and lands like a big idea. You leave the camera still, let it sip the world in individual frames, then play them back as video. Suddenly clouds look like water, a city breathes, a building site turns into a story, and a sky you thought was static shows how much it actually moves.
The creative side is not an extra. It is the reason most of us bother with the timers, the spare batteries, and the second-guessing about intervals. The numbers matter because they keep the vision possible: enough frames for a smooth clip, enough gap between shots for the camera to finish writing, enough card space to finish the night.
What people actually point the camera at
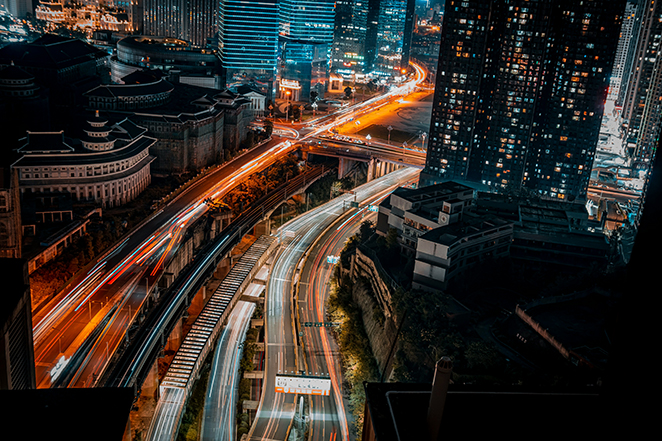
Day into night and back again. A “holy grail” transition is the classic ambition: the frame stays put while the light drains away or comes back. In practice that often means more than one mindset in a single project. You might use shorter intervals while the scene is busy (traffic, shadows, fast clouds), then stretch the interval or change exposure as the sky darkens so stars do not blow out or the foreground does not vanish. The math below assumes a steady interval over the stretch you are planning, which is how many of us sketch a first draft before we start nudging settings in the field.
Stars, Milky Way, and the star-trail look. Pin-sharp constellations in video usually mean relatively short exposures per frame and intervals on the order of many seconds. The Time-lapse Planning Calculator lists 15–30 s as a common band for stars and Milky Way, to combine with whatever exposure time your sky and gear need.
Star trails as a look are a cousin: sometimes you stack many short frames, sometimes you lean on longer individual exposures so each frame already draws a streak. The interval still ties to how much sky motion you want between frames. If exposure length is fighting you, the Astrophotography Calculator is a separate conversation about shutter time and noise, but it pairs naturally with interval planning.
Weather, water, crowds, and slow life. Storms, fog rolling in, tides, ice melting, flowers opening, a plaza filling for an event: all of these reward patience. Intervals in the seconds feel cinematic for clouds and surf; minutes between frames are normal for construction, growing plants, or a long study of light across a room.
Sunset and sunrise without the label. You do not have to chase a viral transition clip. Sometimes you only want a dignified minute of video that says “this evening happened.” Intervals around 3–5 s are a familiar starting point for that kind of sky, the same range many shooters use before they refine by taste.
Tips and tricks many people learn the hard way
Dew on the glass. On clear nights the front of the lens can cool faster than the air around it, and moisture condenses right where you need clarity. A lens warmer (a flexible heater strap powered by USB) is the usual fix for long star or night-sky runs. Some people improvise with hand warmers and cloth, but dedicated straps give steadier heat and less guesswork. If you shoot cold mornings or foggy coastlines, the same idea applies: once the element mists over, the sequence is done unless you recover it in time.
Power that outlasts one battery. A wall-powered shoot is easy; a ridge line or rooftop is not. External power through USB-C (where the camera supports it), a manufacturer grip with extra cells, or a dummy battery kit fed by a larger pack can keep the camera alive for multi-hour or overnight captures. Check your body’s manual for safe continuous use and cable strain. Cold weather saps lithium cells faster than the math suggests, so a spare battery in an inside pocket still matters even when you run mains-style power.
Cards, buffers, and the moment everything stops. Long runs eat space quickly, especially in RAW. A fresh high-capacity card, formatted in camera before you start, beats discovering you are full at blue hour. If the camera has two slots, decide whether you want backup, overflow, or JPEG-only on the second slot before the first frame.
Tripod, focus, and surprises. Lock the tripod legs and head, and add weight or a low stance if wind picks up. Switch to manual focus after you nail sharpness so autofocus does not hunt when the light changes. On DSLR bodies, cover the viewfinder on long exposures so stray light does not leak through the eyepiece (less of an issue on many mirrorless designs, but worth remembering if you still shoot an optical finder).
Cables and courtesy. Tape or strain-relief USB cables so a kick does not unplug you mid-sequence. In crowded spots, a small footprint and a polite distance from walkways keep both your frame and your gear safer.
When the math earns its keep
Once you know what you are trying to show, a little arithmetic saves you from a clip that is two seconds long when you wanted thirty, or a card that fills at the worst moment.
The Time-lapse Planning Calculator uses the same relationships as this section. You can solve for clip length, event duration, or shooting interval there if you would rather not do it by hand.
Names for the pieces:
- T = how long the real event lasts in seconds (you are on location, shooting).
- Δ = shooting interval in seconds (time from the start of one shot to the start of the next).
- fps = playback frame rate of the finished video (24, 25, 30, and 60 are common).
- P = number of photos that become your clip.
- L = length of the finished clip in seconds.
Frames from a steady shoot:
P = floor(T / Δ)
The calculator uses that floor so you get a whole number of frames, like real gear does.
Clip length from frames:
L = P / fps
How hard you are compressing time (a useful gut check): roughly fps × Δ real seconds go into each second of playback. Example: Δ = 5 s and fps = 24 gives about 120× compression. One hour of real time at a 5 s step gives P = floor(3,600 / 5) = 720 photos, and L = 720 / 24 = 30 s of video, the same worked example the calculator describes in its help copy.
Working backward is the same algebra with different letters pulled to the front. If you know target L and fps, then P = L × fps. Pair that with T to get Δ = T / P, or with Δ to estimate T ≈ P × Δ.
Leave breathing room. Your interval has to stay longer than the exposure plus the time the camera needs to write the file. Cut it too close and the rhythm stutters or frames drop. That is a practical constraint, not pessimism.
Storage. Rough total is P × (megabytes per image). The calculator’s default 25 MB per frame is a round guess for full RAW; JPEGs are kinder. A 30 s clip at 24 fps is 720 frames, which is about 18 GB at 25 MB each. Your own test shot is the best way to replace that default with your truth.
Intervals as starting points, not rules
These bands are the same presets the calculator lists: good when you need a first guess before you refine by eye.
- Fast clouds or traffic: about 1–3 s
- Sunset or sunrise: about 3–5 s
- Slower sky: about 5–10 s
- Stars / Milky Way: about 15–30 s (exposure and motion blur matter as much as spacing)
- Plants, construction, very slow change: minutes between frames
Tweak until the motion feels honest for your subject. The formulas only describe the schedule; taste still picks the interval.
Sources
- Time-lapse photography (overview of technique and playback concepts).